Calculator creation
- Which are the requirements for the spreadsheet file?
- Where to start to build a calculator?
- What is the 'domain/allowed domains' input field for?
- How to introduce styles/colors, alignment of the cells?
- What do I need to do at the layout/editor page?
- Input Fields
- Text
- Number
- File
- Color
- Select
- Select Linked
- Select Multiple
- Datetime
- Date
- Time
- Hidden
- Slider (Range)
- Validations
- Can I add images to the form?
- Can I add images as 'result' of the calculator?
- Can I add images as 'input' of the calculator (different images to choose from)?
- How to update internal prices/data for existing calculator?
- Can I add charts as 'result' of the calculator?
- How to use the template catalog?
- How to add Links
- Adding tabs to your form page
Which are the requirements for the spreadsheet file?
The only mandatory requirement is that your calculator must be a working xlsx file. As default layout will be created using the first sheet, we suggest to place at the first sheet the only 'visible' part of your calculator, and place all intermediate calculations, data tables, etc, at the other sheets. For getting a better layout, we recommend to create your form using 2, 4 or 6 columns.
Important Tip!
- If you plan to modify your form layout in the future (adding for example extra inputs or sections) you will want to use a Namedrange for each of your input cells. This way, even if you rebuild completely your layout, the editor will keep all your inputs configuration.
- If you manually add to your layout either images or charts using the editor, using a namerange for the destination cells will also keep their right position if you rebuild the layout.
- Please ensure you don't have any sheet, cell, etc... with data protection enabled. This won't allow the tool to read the sheet contents properly
Where to start to build a calculator?
Once you have your spreadsheet ready, access Calculators->New calculator. Give it a name, and upload the file. You will be forwarded to layout page in order to finish configuration.
What is the 'domain/allowed domains' input field for?
We are going to restrict your calculators to your websites. Even if someone 'copies' from your page source the widget code and places it in another website, we'll restrict the access so we'll ensure no one can consume your executions. You can place (comma separated) as many domains as you want.
How to introduce styles/colors, alignment of the cells?
The tool will extract all style information from your spreadsheet cells, so you can completely style your form at the spreadsheet (background and font color and size, alignment, borders, etc ). This way you'll get a form ready to publish. But you also have a style editor at the layout page in case you need to add any additional style at configuration step.
What do I need to do at the layout/editor page?
This step will show you your spreadsheet contents already styled as you had at the spreadsheet. You only need to select which cells will be 'inputs' at your form. Click on one cell, and select at the right panel 'input cell'->input type (number, text, combobox, etc..). You can also add any style here to any cell, change texts, and adjust columns width.
Input Fields
Text

Select your cell and set it as input type text using the right menu.
- Value: Set the Value of the field
- Placeholder: Field Placeholder
- Input Prepend: Set any text on left side of the input
- Input Append: Set any text on right side of the input
Number

Select your cell and set it as input type number using the right menu.
- Value: Set the Value of the field
- Placeholder: Field Placeholder
- Input Prepend: Set any text on left side of the input
- Input Append: Set any text on right side of the input
- Include controls: Check if you want +/- controls

File

Select your cell and set it as input type file using the right menu.
- Accept: This will be set if you need to limit files uploaded depending on type. You can set:
- File extension:.jpeg, .gif,.zip,.docx
- image/*: all Images
- video/*: all Video files
- audio/*: all Audio files
- A valid media type: you can check the complete list at IANA Media types
- Multiple: Set to allow users to upload more than one file
Color

Select your cell and set it as input type color using the right menu.
- Value: Set the Value of the field
Select

Select your cell and set it as input type select using the right menu.
- Sheet: Select the Sheet of your Excel file where the data of the select is.
- Range: Set the range in the Sheet selected above where XLSJuice will get the data. I.e.: A1:A20
- Use Search: Add a search input on select
Select Linked
Select linked is a special kind of combobox. It automatically reloads its options depending on other combobox value. Find out how to configure:

Select your cell and set it as input type select multiple using the right menu.
- Sheet: Select the Sheet of your Excel file where the data of the select is.
- Range: Set the range in the Sheet selected above where XLSJuice will get the data. I.e.: A1:A20
- Use Search: Add a search input on select
- Parent: Set the Select input that will reload options for this Select.
How it works:
Once the user select the 'parent' input, the value will be placed at the right excel cell and current 'select linked' combobos will get data from your excel file in the sheet and range configured.When refreshing options it will exclude blank cells, so this will be used to discard unwanted options for each case. Write your formulas in a way the value will return blank if with that parent value you don't want to show that option, return the option text otherwise.
Select Multiple

Select your cell and set it as input type select multiple using the right menu.
- Sheet: Select the Sheet of your Excel file where the data of the select is.
- Range: Set the range in the Sheet selected above where XLSJuice will get the data. I.e.: A1:A20
- Use Search: Add a search input on select
- Separator: This separator will be added between items selected in the spreadsheet cell
Datetime

Select your cell and set it as input type datetime using the right menu.
- Value: Set the Value of the field
- Placeholder: Field Placeholder
Date

Select your cell and set it as input type date using the right menu.
- Value: Set the Value of the field
- Placeholder: Field Placeholder
Time

Select your cell and set it as input type time using the right menu.
- Value: Set the Value of the field
- Placeholder: Field Placeholder
Hidden

Select your cell and set it as input type hidden using the right menu.
- Value: Set the Value of the field
- Placeholder: Field Placeholder
Slider (Range)

Select your cell and set it as input type slider using the right menu.
- Value: Set the Value of the field
- Placeholder: Field Placeholder
- In order to configure Slider properties you must add the following validations:
- step: The stepping interval
- max: The maximum value allowed
- min: The minimum value allowed
For each validation you can configure also a validation message, but they won't apply to this field type because the slider is already configured with these limits, so no validation messages will appear.
Validations
Here are validations you can added to your inputs:
| Name | Description | Valid for |
|---|---|---|
| Required | Makes the element required | text inputs, selects, checkboxes and radio buttons |
| Makes the element require a valid email | text inputs | |
| URL | Makes the element require a valid url | text inputs |
| DateISO | Makes the element require an ISO date | text inputs |
| Number | Makes the element require a decimal number | text inputs |
| Digits | Makes the element require digits only | text inputs |
| Minlength | Makes the element require a given minimum length | text inputs, selects and checkboxes |
| Maxlength | Makes the element require a given maximum length | text inputs, selects and checkboxes |
| Rangelength | Makes the element require a given value range | text inputs, selects and checkboxes |
| Min | Makes the element require a given minimum | text inputs |
| Max | Makes the element require a given maximum | text inputs |
| Range | Makes the element require a given value range | text inputs |
| Step | Makes the element require a given step | text inputs, number and range |
| Equalto | Requires the element to be the same as another one |
Tip: You can combine as many validations as needed. Form will validate fields once user clicks on 'Calculate' button.
Can I add images to the form?
Sure, this is available for all non-trial subscriptions. You need to drag&drop the 'image' tool from the editor left panel to the position where you want to place it. Then write the image url at the right panel configuration, and you're done.
Can I add images as 'result' of the calculator?
Yes, an image and any other html valid content, you can check an example at the BMI calculator available from our catalog. One of the results is the image of the man according to the bmi (normal, overweight...). You only need to build the proper html img tag at your spreadsheet and mark it as output.
Can I add images as 'input' of the calculator (different images to choose from)?
Yes, there is an advanced field type (Pro plan only) called 'image selector'. The configuration is simple: you set at the spreadsheet the list of the urls for the images, and at the input field you type the range where to find them, for ex : B4:B8 This will create an image selector with 4 images, according to the 4 urls provided at that range.
How to update internal prices/data for existing calculator?
You only need to upload again your updated file at the first configuration step. From that same moment, calculations will use the new file in order to get results.
If you also need to introduce any visual change to your calculator layout (for ex, you have changed any static text, added some background or new style, or need to insert any new input or output to the form), you will also need to click the 'rebuild layout' button at the editor page. Before using this option, we strongly suggest you previously add nameranges to your input cells, this way all configuration will be preserved even if you move/add new rows to your form.
Can I add charts as 'result' of the calculator?
Yes, (only Pro plan). At your spreadsheet you need to set one different 'name' to each chart. Once uploaded the spreadsheet, go to the layout editor and drag&drop the 'chart' widget from the editor left panel to the position where you want to place the chart. Then select at the right panel the name of the chart to be shown. You can place any number of charts in a form, and also include them at the email and or pdf export.
How to use the template catalog?
You have a set of working calculators at Calculators->templates/catalog. Just enter the list and choose one of the calculators, click the icon 'duplicate', and the calculator will be copied to your own catalog list. From there you will be able to enter the layout and configure same as your other calculators.
How to add Links
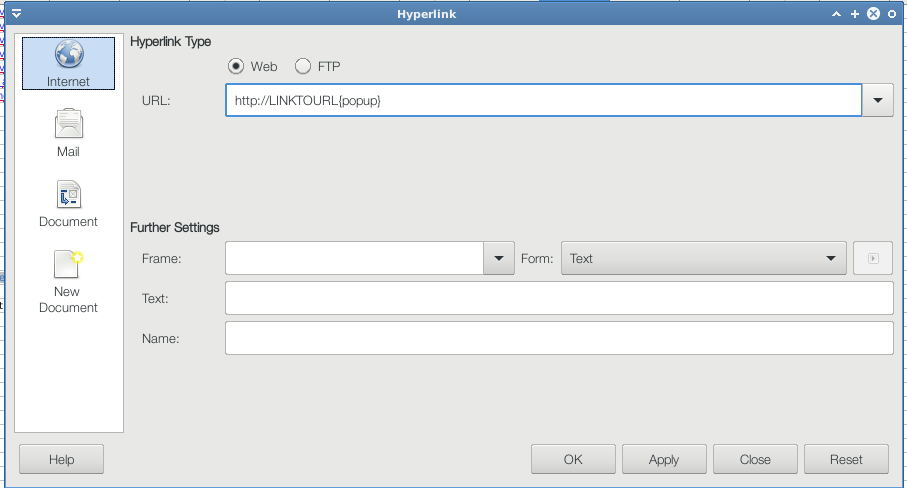
You can add different type of links to your form. Choose your cell and use the default Hyperlink option:
- Normal Link: Use the link option at your sheet
 The link will appear in your form as a normal HTML link.
 - Popup Link: Use the normal link option but adding at the end of the URL the following: {popup}

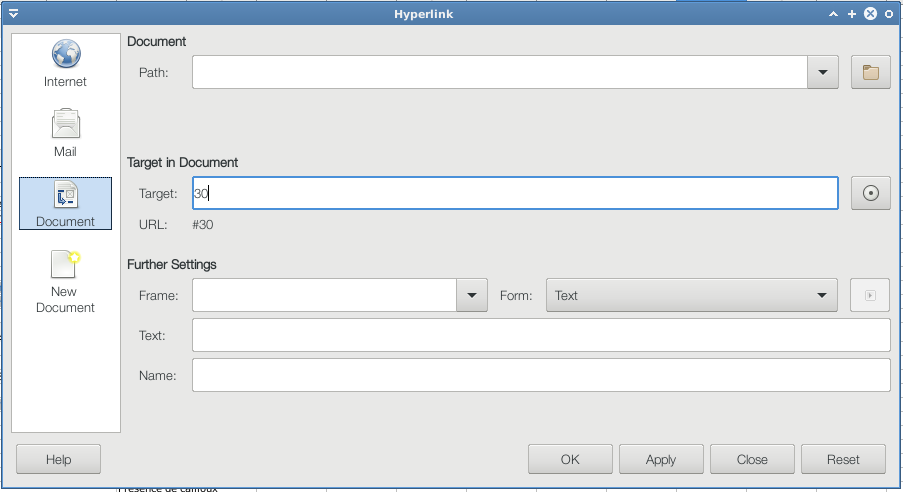
- Bookmark/Internal link: Use the Document option at Hyperlink, and set the number of the row in your Excel you want to travel to.


Adding tabs to your form page
In order to add a tab widget to your page you only need to name at the excel file the different sections, and include the widget tab from the left menu at the page editor.
- Name your sections at the excel sheet
- Go to layout editor and drag & drop the tab widget to the desired location
- Add as many tabs as needed using the 'add' button. Give a title and choose the section for each one